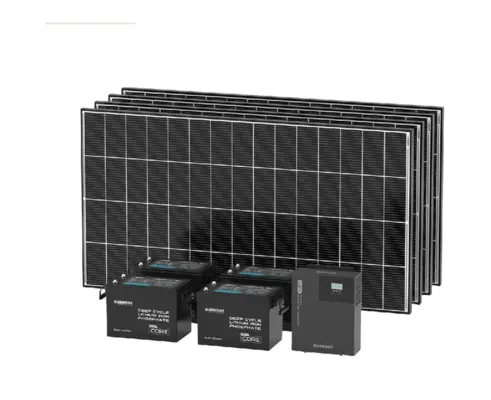
How to Build a DIY Solar Battery Bank: Complete Guide
Affiliate disclosure: This page contains paid links to Amazon and eBay. If you buy through them, we may earn a commission at no extra cost to you. As an Amazon Associate I earn from qualifying purchases.
Building your own solar battery bank is the single most impactful upgrade you can make to an off-grid or hybrid solar system. A well-designed bank stores every watt your panels produce during the day and delivers it reliably at night, during storms, or whenever the grid fails. The alternative — buying a pre-built all-in-one power station — costs significantly more per kilowatt-hour of storage and limits your ability to expand.
This guide walks through every step of designing, sizing, wiring, and safely installing a DIY solar battery bank using LiFePO4 (lithium iron phosphate) chemistry, which has become the undisputed standard for solar storage in 2026. We will not cover lead-acid or AGM builds — those technologies are outdated for new solar installations and offer roughly one-third the cycle life at comparable cost per usable kilowatt-hour.
In This Guide
Why LiFePO4 Is the Standard for Solar Storage
Lithium iron phosphate batteries deliver 3,000 to 5,000+ charge cycles before reaching 80% capacity — roughly ten to fifteen years of daily cycling. Compare that to AGM batteries at 500–800 cycles or flooded lead-acid at 300–500 cycles. The math is decisive: a LiFePO4 battery that costs three times more upfront but lasts five times longer is the cheaper option over any reasonable time horizon.
Beyond cycle life, LiFePO4 offers three critical advantages for solar applications. First, nearly all rated capacity is usable — you can safely discharge to 10–20% state of charge without damaging the cells, whereas lead-acid batteries should never go below 50%. A 100Ah LiFePO4 battery delivers 80–90Ah of usable energy; a 100Ah lead-acid battery delivers roughly 50Ah. Second, the iron phosphate cathode chemistry is inherently stable — no thermal runaway risk, no venting, no fire hazard under normal operating conditions. Third, LiFePO4 maintains a flat voltage curve through approximately 90% of its discharge range, which means your inverter receives consistent voltage and your appliances run at full performance until the battery is nearly empty.
Pro Tip: Never mix LiFePO4 batteries from different manufacturers or different production batches in the same bank. Different BMS configurations, cell grades, and internal resistance profiles can cause one battery to absorb disproportionate charge or discharge current, accelerating degradation and triggering protection shutdowns.
Sizing Your Battery Bank
Battery bank sizing starts with a single number: your daily energy consumption in watt-hours (Wh). Every appliance in your system has a wattage rating and a daily runtime. Multiply watts by hours for each device, then sum the totals.
A typical off-grid cabin might look like this: LED lighting at 50W for 6 hours (300Wh), a 12V refrigerator at 50W for 12 hours (600Wh), laptop and phone charging at 100W for 4 hours (400Wh), a water pump at 200W for 1 hour (200Wh), and a Wi-Fi router at 15W for 24 hours (360Wh). Total: approximately 1,860Wh per day.
Once you have your daily consumption, decide how many days of autonomy you want — the number of consecutive cloudy or low-production days your bank can support without solar input. For most residential off-grid systems, two to three days is standard. For an RV or weekend cabin, one day may suffice.
The sizing formula is straightforward: Bank capacity (Wh) = Daily consumption × Days of autonomy ÷ Usable depth of discharge. Using our cabin example with two days of autonomy and 80% usable DoD: 1,860 × 2 ÷ 0.80 = 4,650Wh, or roughly 4.65 kWh. At 12V, that is approximately 388Ah. At 48V, it is approximately 97Ah.
Efficiency Losses: Real-world systems lose 10–15% of energy through inverter conversion, cable resistance, charge controller overhead, and battery internal resistance. Add a 15% buffer to your calculated bank size to account for these losses. Our 4,650Wh target becomes approximately 5,350Wh after the buffer.
Choosing Your System Voltage: 12V, 24V, or 48V
System voltage determines your wire gauge requirements, maximum practical bank size, and inverter options. The rule is simple: higher voltage means lower current for the same wattage, which means thinner (cheaper) cables and less heat loss.
| Factor | 12V System | 24V System | 48V System |
|---|---|---|---|
| Best for | RVs, vans, small cabins | Mid-size cabins, boats | Whole-home, large off-grid |
| Current at 3,000W | 250A | 125A | 62.5A |
| Cable cost | High (thick gauge needed) | Moderate | Low (thinner gauge) |
| Inverter options | Many, widely available | Good selection | Best for hybrid inverters |
| Expandability | Limited (high current) | Moderate | Best (low current per kWh) |
| Typical bank size | 1–5 kWh | 3–10 kWh | 5–30+ kWh |
For new builds in 2026, 48V is the default recommendation for any system larger than 5 kWh. The EG4 LL-S 48V 100Ah — one of the most popular DIY batteries — delivers 5.12 kWh in a single rack-mountable unit at approximately $120/kWh. Two of these give you a 10 kWh bank with minimal wiring complexity. At 12V, achieving the same 10 kWh capacity would require a four-battery parallel setup drawing far higher current through much thicker cables.
The exception is mobile applications — RVs, vans, and boats — where 12V remains standard because most mobile appliances (fridge, lights, water pump, fan) run natively on 12V DC, eliminating the need for voltage conversion.
Components You Need Beyond Batteries
A complete DIY battery bank requires more than just batteries. Here is everything you need to purchase alongside your LiFePO4 cells.
Battery Management System (BMS): Every quality LiFePO4 battery includes an internal BMS that monitors cell voltages, temperature, and current. If you are building from raw prismatic cells (an advanced approach), you will need a standalone BMS. For pre-built batteries from LiTime, SOK, Battle Born, Renogy, or EG4, the BMS is already integrated.
Properly sized cables and fusing: Undersized cables are the most common DIY battery bank failure. Every connection must handle the maximum expected current with margin. Use a wire gauge calculator — never guess. Between batteries in parallel, use identical cable lengths to ensure balanced current sharing. Every battery should have its own fuse sized to the BMS maximum discharge rating.
Battery monitor or shunt: A shunt-based monitor (such as the Victron SmartShunt or Renogy 500A monitor) tracks actual state of charge, voltage, current, and historical data. Bluetooth-enabled monitors let you check battery status from your phone. Many newer LiFePO4 batteries include built-in Bluetooth monitoring, but a system-level shunt provides more accurate data than individual battery BMS readings.
Disconnect switch: A DC disconnect between your battery bank and inverter allows safe maintenance and emergency shutdown. This is a code requirement in most jurisdictions for permanently installed systems.
Enclosure or rack: Server-rack style 48V batteries stack neatly in standard 19-inch equipment racks. For 12V batteries, a ventilated enclosure keeps connections protected. LiFePO4 does not produce hydrogen gas during charging (unlike lead-acid), so sealed indoor enclosures are acceptable — but adequate ventilation for heat dissipation is still necessary.
Wiring: Series, Parallel, and Series-Parallel
Series wiring connects the positive terminal of one battery to the negative terminal of the next. This increases voltage while keeping capacity (Ah) the same. Two 12V 100Ah batteries in series produce 24V at 100Ah (2,560Wh total).
Parallel wiring connects all positive terminals together and all negative terminals together. This increases capacity while keeping voltage the same. Two 12V 100Ah batteries in parallel produce 12V at 200Ah (2,560Wh total).
Series-parallel combines both approaches for systems that need higher voltage and higher capacity. Four 12V 100Ah batteries wired as two series pairs in parallel produce 24V at 200Ah (5,120Wh total).
Critical: When wiring batteries in parallel, use identical cable lengths from each battery to the bus bar. Unequal cable lengths create unequal resistance, causing one battery to charge faster and discharge harder than the others. This is the single most common cause of premature failure in parallel LiFePO4 banks.
Understanding the BMS
The Battery Management System is the brain of every LiFePO4 battery. It performs four critical functions: cell balancing (ensuring all cells maintain equal voltage), overcurrent protection (shutting down if discharge exceeds the rated maximum), over-discharge protection (cutting output before cells drop below safe voltage), and temperature protection (preventing charging below freezing, which causes irreversible lithium plating damage to the cells).
The BMS continuous discharge rating determines how many watts you can pull from the battery. A 100A BMS on a 12V battery supports 1,200W continuous. A 200A BMS supports 2,400W. If your inverter draws more than the BMS allows, the BMS will shut down the battery — an frustrating experience that is entirely preventable with proper sizing.
When comparing batteries, look beyond the Ah rating and check the BMS specs: continuous discharge amps, peak surge amps (and for how long), low-temperature charging cutoff, and whether the battery supports series or parallel wiring. Not all LiFePO4 batteries support series connections — verify before purchasing.
Charging Your Battery Bank From Solar
Solar charging requires an MPPT (Maximum Power Point Tracking) charge controller between your panels and battery bank. The controller converts the higher panel voltage to the precise charging voltage your batteries need while maximizing energy harvest. PWM (Pulse Width Modulation) controllers are cheaper but waste 15–30% of available solar energy — not recommended for any system you are investing real money in.
Key charge controller sizing rules: the controller must match your battery bank voltage (12V, 24V, or 48V) and handle the maximum current your panel array can produce. A 400W panel array at 12V produces roughly 33A — you need at least a 40A controller. At 48V, the same 400W array produces only about 8A, illustrating why higher-voltage systems simplify everything downstream.
LiFePO4 requires specific charge parameters that differ from lead-acid. Standard settings are 14.4V absorption (for 12V systems), 13.6V float, and zero equalization. Most modern MPPT controllers from Victron, Renogy, and EPEver include a dedicated LiFePO4 profile. Using a lead-acid profile on LiFePO4 batteries will result in incomplete charging or BMS shutdowns.
Safety and Code Requirements
A properly built LiFePO4 battery bank is inherently safe — no hydrogen gas, no acid, no thermal runaway risk. However, the high currents involved demand respect. A 48V battery bank shorted through a wrench can deliver thousands of amps and arc-weld metal. Always work with insulated tools, remove jewelry, and follow lockout/tagout procedures when working on battery connections.
For permanently installed systems, most U.S. jurisdictions require compliance with NEC Article 706 (Energy Storage Systems). Key requirements include a DC disconnect within sight of the battery bank, overcurrent protection (fusing) on every ungrounded conductor, a placard identifying the system as an energy storage system, and accessible maintenance space. Check your local AHJ (Authority Having Jurisdiction) for specific requirements — they vary by state and municipality.
Top Batteries for DIY Solar Banks in 2026
EG4 LL-S 48V 100Ah
$$The default choice for whole-home DIY solar builders — strong BMS, built-in heating, server rack form factor.
- 5.12 kWh per unit at 48V nominal
- 100A continuous BMS — supports ~5,100W discharge
- Built-in low-temperature heating for cold climates
- Server rack form factor — stacks cleanly in 19-inch racks
- CAN-bus communication with popular hybrid inverters (EG4, Sol-Ark, Victron)
- Approximately $120/kWh — strong value for 48V architecture
- 10-year warranty
LiTime 12V 200Ah
$The budget king — delivers solid LiFePO4 performance at roughly $90/kWh for 12V systems.
- 200Ah at 12.8V — 2,560Wh per unit
- 100A continuous BMS with 200A peak surge
- Built-in Bluetooth monitoring via app
- 4,000+ cycle life rating
- Group 8D form factor — fits most RV and marine compartments
- Series-capable (up to 4 units for 48V) — verify with manufacturer
- Approximately $90/kWh — among the lowest cost per kWh available
SOK 12V 206Ah
$$Best single-unit 12V capacity with a beefy 200A BMS — eliminates the need for parallel wiring.
- 206Ah at 12.8V — 2,637Wh usable
- 200A continuous BMS — supports 2,400W+ discharge from a single battery
- Built-in Bluetooth with cell-level monitoring
- 10-year warranty — among the longest in 12V consumer LiFePO4
- 47 lbs, 20.5 inches long — does NOT fit standard Group 24/27/31 compartments
- Ideal for RVs and vans that need high discharge without parallel banks
Battle Born 100Ah 12V
$$$The premium standard — US-built, proven since 2014, easiest warranty process in the industry.
- 100Ah at 12.8V — 1,280Wh per unit
- 100A continuous BMS
- US-based manufacturing and support — fastest warranty turnaround
- 10-year warranty with drop-ship replacement
- The most widely stocked LiFePO4 in RV and marine retail — available locally
- Price premium is significant: approximately $330/kWh vs $90/kWh for LiTime
- Justified for full-time RVers and liveaboards where downtime costs money
Renogy 12V 100Ah Smart
$$Best choice for all-Renogy ecosystems — unified app monitoring across panels, controller, and battery.
- 100Ah at 12.8V with built-in Bluetooth
- Integrates with Renogy ONE app alongside Renogy panels and charge controllers
- Self-heating model available for cold climates
- Compatible with Renogy DC Home system for 12V appliance management
- Comparable performance to LiTime at a slight price premium
- Strongest option when building a single-brand Renogy system
Common Mistakes to Avoid
Undersizing cables: A 200A battery bank connected through 8-gauge wire will overheat, melt insulation, and potentially start a fire. Use a wire gauge calculator and always size up, not down. For 200A at 12V over a 3-foot run, you need 2/0 AWG cable minimum.
Charging below freezing: Charging LiFePO4 cells below 32°F (0°C) causes lithium plating — irreversible internal damage that permanently reduces capacity. If your system operates in cold climates, buy batteries with built-in heating pads (EG4 LL-S, Renogy self-heating models) or install the bank in a temperature-controlled space.
Skipping the battery monitor: Relying on the individual battery BMS readout is adequate for a single-battery setup. For multi-battery banks, a system-level shunt monitor (Victron SmartShunt, Renogy 500A) provides accurate whole-bank state of charge, current flow, and historical data. Without it, you are flying blind.
Mixing old and new batteries: Adding a new battery to an existing bank of batteries that have hundreds of cycles on them creates an imbalance. The new battery has lower internal resistance and will absorb more charge and deliver more discharge current than the aged batteries, accelerating degradation across the entire bank. Build your bank in one purchase.
Ignoring the inverter-BMS relationship: Your inverter's maximum input current must not exceed your total BMS discharge rating. If you have two 100A BMS batteries in parallel (200A total) connected to a 48V inverter, your maximum sustained output is roughly 9,600W. Pulling 10,000W will trip the BMS shutdown — and it will happen at the worst possible time.
A well-designed DIY battery bank costs less per kWh than any commercial all-in-one solution and gives you complete control over capacity, voltage architecture, and expansion. The key is doing the math before buying components, using properly sized cables and fusing throughout, and treating the BMS ratings as hard limits rather than suggestions. For system sizing help, see our solar system sizing guide, and for panel selection, check our solar components overview.
Frequently Asked Questions
How much does a DIY LiFePO4 battery bank cost per kWh in 2026?
Budget LiFePO4 batteries like the LiTime 12V 200Ah cost approximately $90 per kWh. Mid-range 48V options like the EG4 LL-S run about $120 per kWh. Premium brands like Battle Born cost approximately $330 per kWh. Building from raw prismatic cells can drop costs to $80–110 per kWh but requires purchasing a standalone BMS and building an enclosure.
Can I mix LiFePO4 batteries from different brands?
We strongly advise against it. Different manufacturers use different BMS configurations, cell grades, and voltage profiles. Mixing brands in a parallel bank causes unequal charge and discharge distribution, accelerating degradation and triggering BMS shutdowns. Use identical batteries from the same manufacturer and ideally the same production batch.
How long does a LiFePO4 solar battery bank last?
Most LiFePO4 batteries are rated for 3,000 to 5,000+ charge cycles at 80% depth of discharge. With daily cycling, that translates to roughly 8–15 years of service before the battery reaches 80% of its original capacity. Even at 80% capacity, the battery continues to function — it simply holds less energy per charge.
Do I need a special charge controller for LiFePO4 batteries?
You need an MPPT charge controller with a LiFePO4 charging profile. Standard charge parameters are 14.4V absorption and 13.6V float for 12V systems (multiply by 2 for 24V, by 4 for 48V). Most modern MPPT controllers from Victron, Renogy, and EPEver include a dedicated LiFePO4 profile. Never use an equalization cycle on LiFePO4 batteries.
Is it safe to install a LiFePO4 battery bank indoors?
Yes. LiFePO4 chemistry does not produce hydrogen gas during charging and has no thermal runaway risk under normal conditions. Indoor installation is standard practice. Ensure adequate ventilation for heat dissipation, install a DC disconnect within sight of the bank, and follow NEC Article 706 requirements for permanently installed energy storage systems.
Affiliate Disclosure: SolarPanelKits.co is a participant in the Amazon Services LLC Associates Program and eBay Partner Network. We earn commissions from qualifying purchases at no extra cost to you. All recommendations are based on genuine research — we never fabricate reviews or ratings.